Header Ads Widget

Ticker

6/recent/ticker-posts

Happy Birthday to Me! 47 Is Gonna Be My Year of Fearless Free-Motion and Ruler Work Quilting

I am finally having fun with free motion quilting on my long arm machine!  Yay!  The chalk pounce stenciling is imperfect, as it smudges and disappears while I'm quilting, but all I really need is a vague guide anyway for spacing and the angle of the curls.  If I mark just one motif with chalk at a time and then quilt it right away, it serves its purpose -- and I have zero fear that the chalk won't come out of my quilt, since it's all bouncing right off the quilt without settling into the fibers in the first place.  


Not Perfect, But Not Hideous, Either.  I Like It!
After being punished for my impatience the other day with a tension tantrum on the back of my quilt that took hours to rip out, I resumed my practice of slapping fabric scraps down "in the margins" of my excess batting and backing, to test my stitching before I start quilting and after every bobbin change, EVERY. SINGLE. TIME.


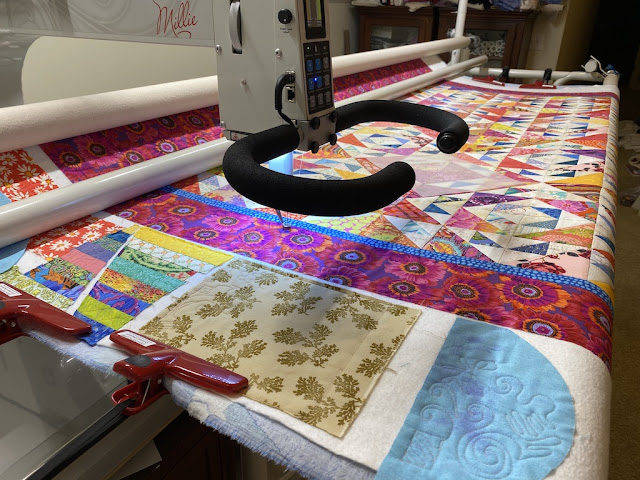
Extra Wide Margins of Excess Batting and Backing for Tension Testing

I have approximately 9 1/2" of excess batting and backing on both sides of my quilt top.  That gives me plenty of room for these little warmup/test stitching scraps on both sides of the quilt, and there's one additional bonus.  Having that much extra batting and backing on both sides means my side clamps are well out of the way of my ruler base, so I don't need curtain rods, yard sticks, pool noodles, or any other contraptions to lift the clamps out of the way of the machine.


Hobbs Tuscany Wool Batting, My Tabby Mountain Disco Kitties Quilt
Speaking of the batting...  Compare the batting in the photo above (my Tabby Mountain Disco Kitties quilt from 2018) to the batting in the previous photo of my Spirit Song quilt.  Spirit Song's batting is Quilter's Dream Cotton Select, much thinner than the Hobbs Tuscany Wool batting I used for the Disco Kitties.  The Hobbs 80/20 cotton/poly blend that I think of as my "basic" go-to batting has a little more loft than the 100% cotton batting, but not nearly so much as the wool.  If I had an 80/20 batting under my Spirit Song top right now, I would have better definition and dimension to my quilting designs so you could see them better, and I would also have a little more leeway with tension fluctuations because of the thicker batting allowing more room for the stitches to lock together inside the quilt sandwich.  However, the 100% cotton Quilter's Dream Select batting will probably shrink and pucker more in my Spirit Song quilt, giving it a nice crinkly texture and helping to camouflage the wobbles and bobbles of my developing skills.  Every batting has its plusses and minuses, and it all depends on what you want for each quilt.

But I digress...  Back to the quilt at hand.  This is one of my DIY 24 pound vellum paper stencils, traced with ultra fine Sharpie marker and perforated along the drawn lines by sewing with an unthreaded domestic sewing machine.  I've tried multiple different brands and colors of chalk powder for transferring the stencils and none of them would work if my design was super intricate or required a great degree of accuracy, but the regular white Pounce Chalk with the pounce pad is working best on most of my colored triangles, and on the fabrics that were too light for the white chalk to be visible, I used the Pounce Chalk in blue that is supposed to need to be washed out of the quilt.  Ha, ha, HA!  I WISH it stayed on my quilt long enough to need washing out, instead of bouncing right off the quilt surface immediately.  Your mileage may vary, though (especially if you're not a starch fiend like I am), so please do your own testing before using colored chalk on your quilts.


DIY Vellum Stencil, Ready for Pounce Chalk Transfer
It is definitely not perfect, but each one gets a little better.  This is where it pays off to be "practicing" by quilting a real quilt.  If I was doing this design on muslin with contrasting thread, all I would see would be the shortcomings.  On these gloriously cheerful fabrics, those oopses are less noticeable and it's a lot more FUN!


Ta Da!  Even Though the Orange Ones Look Like Snakes...
After quilting those free-motion curls around the center triangles, I move to the ruler work in the outer triangles, all of which is marked with the washout blue marking pen.  It's too humid where I live for the purple air erasable marker to work for me; that one disappears faster than the chalk powder.


HandiQuilter VersaTool (with Pink Glo Tape Added)
I'm able to use the etched lines on my Quilter's Groove ProMini 2 1/2" x 6" ruler for most of my ruler work on this quilt, lining up the 90 degree and 45 degree angle etched lines on the rulers with my piecing seams in the quilt top.  But, for this little boomerang shape, it's not a 45 degree angle so there's no reference line to match up on my ProLine ruler.  The ruler needs to be positioned 1/4" away from where I want the stitching line to end, because that's the distance from the outside of the hopping foot to the needle.  With time, quilters are able to eyeballthat distance fairly accurately, but I'm not there yet.  Enter the HandiQuilter VersaTool ruler!

HandiQuilter VersaTool with Glow Line Tape 
They call it the VersaTool because each side of the ruler can be used for something different, but so far I've only used this ruler for the straight edge on the left that has notches for quarter inch alignment on either end.  Instead of guesstimating that your ruler is 1/4" from where you want your stitches, you match up the etched line on the ruler with where you want your stitches to end, and that automatically puts the straight edge of the ruler right where it needs to be.  I couldn't see that etched line very well with the bright lights and glare off the ruler, though, so I added little bits of low-tack adhesive fluorescent pink Glow Line Tape to the back edge.  I love that stuff -- bought it originally for marking where a quarter edge seam would be on one of my sewing machines, but end up using it all the time to clearly mark lines on rulers -- especially rotary cutting rulers, because sometimes when I'm cutting strips on autopilot I accidentally line up my fabric with the wrong ruler line and waste fabric due to miscuts...  It took me nearly an hour to find my Glow Line Tape in a messy pile in my studio, but it was totally worth the hunt.

The two donut-looking clear stickers at the top of the ruler are TrueGrip non-slip ruler grips.  They work well for preventing rulers from slipping, but they are pricey and they are a little on the thick side.  The long, clear, textured piece of tape along the left straight edge of the ruler is 3M's Nexcare Flexible Clear Tape, a super cheap solution for slipping rulers that you can find in the first aid section of your local pharmacy.  It tears easily, sticks to the back of your ruler, and prevents unintentional sliding of the ruler without giving it a death grip, making it perfect for a ruler like this one that you may need to slide on purpose to stitch a longer line.  It's also thin and transparent, so it doesn't obstruct my view of what I'm quilting like some of the other nonslip products do.

Pink Glo Tape Makes Etched Ruler Line Easier to See
Maybe you can see this better against my cutting mat.  The Glow Line Tape is exactly a quarter inch wide, and I believe the Nexcare tape is 1" wide.  Both of these tapes peel off acrylic rulers very easily when you want to remove or reposition them, leaving no sticky residue behind.

My VersaTool Works Even Better Now
At some point, when I get around to using that 90 degree angle or the curve on the left, I'll probably add a couple more pieces of the Nexcare tape near those ruler edges as well.


Feathery Swirls Look Better From a Distance
Aside from that little boomerang detail, the only other ruler I need for this design is my 2 1/2" x 6" Quilter's Groove ProMini.  I don't need to worry about eyeballing the quarter inch because the Quilter's Groove Pro rulers have clearly visible white markings that I can line up with seam lines, stitched lines, or drawn lines on the quilt surface to ensure the ruler is properly positioned to put my stitches where I want them to go.  You can tell these were designed by a long arm quilter, because when I want to quilt a straight line on a quilt, there is almost always a reference line etched into Lisa's rulers that matches up with some kind of reference line on my quilt.  


The One Ruler I Can't Live Without: 6 inch Pro Mini from Quilter's Groove
Here's what it looks like once I've finished quilting over all of those lines that I so carefully marked on my quilt:


Design Stitched Over Blue Marked Lines
That always looks kind of ugly to me, especially on this triangle where I accidentally set a wet scrap of batting on top of the marked design.  Whoops!  But then I paint over the stitched lines with water, using a cheap watercolor paintbrush, and voila:

It Looks So Much Better After the Lines Disappear!
I see some blurry blue in a couple spots in the photo that I missed in person, so I'll hit them with some more water and make sure all the blue is gone before I advance the quilt.

Last but not least, I have to show you guys the View from Underneath the Quilt Frame!  


I Crawled On the Floor to Take This Picture For You 
Oh yes, I did mention a birthday.  I turned 47 yesterday, and it was a relaxing rainy day at home with no one trying to force-feed me cake.  My favorite kind of birthday!  My mom and one of my sisters got me some quilting books that were on my Amazon wish list, my other sister got me a fabulous new Nest reed diffuser for my studio, and my husband got me a grownup coloring book full of birds and flowers that contains all kinds of inspiration for quilting designs and appliqué.   

Birthday Goodies!  They Know Me So Well!

My sons bought me a Henry VIII coffee mug that has all six of his wives on it -- but they disappear when you fill it with hot liquid, and then it tells you how each one died.  Love it!

If This Had Been From My Husband, It Might Have Made Me Nervous...
Bless their hearts -- they know their mama likes her hot tea, her coffee, and her history -- and they spotted Margaret George's book, The Autobiography of Henry VIII: With Notes by His Fool, Will Somers. A Novel on my bookshelves.  :-)

Well, one more "quick blog post" that ran on longer than I intended it to!  I hardly know what day it is anymore.   If today is Thursday, then tomorrow my oldest is headed to Hilton Head Island for the summer.  He will be working at the grocery store and working on his independent living/adulting skills by balancing fun time at the beach with having to get up and get to work on time, and hopefully he'll save up some money for when he goes back to college in the Fall.  My younger son has his last full week of his high school junior year before we can all take a break from this hell that is "online learning."  

Stay safe, y'all, and happy stitching!

I'm linking up today's overly long post with the following linky parties:

THURSDAY

·       Needle and Thread Thursday at My Quilt Infatuation  
·       Free Motion Mavericks at Quilting & Learning Combo OR at Lizzie Lenard Vintage Sewing

FRIDAY

·       Whoop Whoop Fridays at Confessions of a Fabric Addict
·       Peacock Party at Wendy’s Quilts and More
·       Beauty Pageant at From Bolt to Beauty
·       Finished Or Not Friday at Alycia Quilts
·       Off the Wall Friday at Nina Marie Sayre

SATURDAY


·       UFO Busting at Tish in Wonderland

Yorum Gönder

0 Yorumlar